Introduction
So you want to make your own operating system, huh? You’ve searched around, found plenty of resources about scheduling algorithms, memory management techniques and “the way Linux does it”, but still don’t really have a clue how to get started or more importantly where those ideas fit in with the big picture?
This set of tutorials/walkthroughs is designed to help you stitch together the theory and the practical and show you the links between the two, in the hopes that it’ll “click” for you and you’ll be able to go and research new ideas independently.
If you’ve read the previous incarnation of my tutorial series, this will be a slight depart from that formula. While many liked them, there was derision from some corners for them being too “hand-holdy” - spending too much time on basic C instead of the concepts it was trying to teach.
Therefore this is more of a walkthrough than a tutorial - I’ve created what I like to call a teaching kernel. It is a simple UNIX-like operating system that should be portable and maintainable (one of the things that was poor about my previous tutorials was that it was very difficult for me to maintain).
It should ideally serve as a prop or aid to show the basic concepts of operating system implementation or as a base upon which to experiment or research, perhaps as part of an operating systems 101 course (I’ve had this request in the past).
The goal of this chapter in particular is to explain the basics of how the kernel we will build is structured; in particular the build system used and the testing methodology.
What is an operating system?
Before delving into creating a kernel, let’s first step back and define what an operating system actually is.
Wikipedia says:
An operating system (OS) is a set of software that manages computer hardware resources and provide common services for computer programs. The operating system is a vital component of the system software in a computer system. Application programs require an operating system to function.
Linux (or GNU/Linux) is an operating system, as is Windows, as is Mac OS. An operating system provides access to hardware, memory management and task scheduling capabilities, but also importantly provide some sort of shell or interface with which a user can interact with the system.
The canonical shell on a Linux system is a command shell such as /bin/sh,
along with the standard utilities such as mv, cp, grep
etc. Without these, even with /bin/sh a user could not effectively
interact with the system. On windows, the shell is the Windows desktop and
Windows Explorer.
So what is a kernel?
A kernel is a part of an operating system. It runs in a privileged mode and provides and regulates access to hardware, task scheduling, memory management and the minimal set of functionality that nonprivileged applications require to work.
The rest of the operating system sits atop this layer, exposing more complex functionality to the user and perhaps decomposing it into simple calls to the kernel to actually do some work.
For example, the command “mv a.txt b.txt” in a shell expands into several kernel calls:
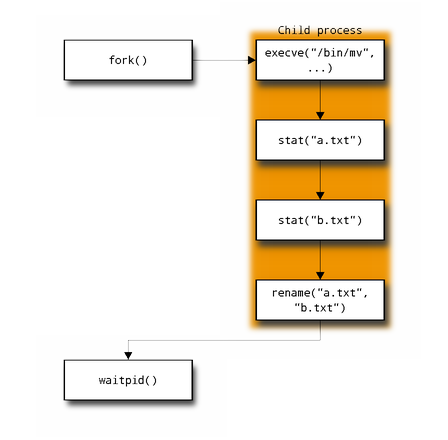
The shell first calls fork() in order to create a new child
process. This process calls execve() to load the executable and start
executing it. Once executing, mv will call stat() on both filenames
to ensure the first exists and the second does not or exists and is not
write-protected.
If these both succeed, mv will then call rename() and exit, where the
call to waitpid in the parent shell process will then return.
Our aim in this tutorial is to create such a kernel, that a “userland” such as the GNU tools found in Linux or the BSD tools in {Open,Net}BSD can sit upon.
This brings us nicely to the next question:
Why UNIX?
As I’ve mentioned earlier, in this tutorial we are attempting to produce a kernel, not a full operating system. That would be a much larger scope of problem (although of course can be done).
A kernel interacts with the rest of the system (OS and user applications) via some API, and in the case of UNIX this is clearly specified in the POSIX specification - if we stick to this API, we should be able to build and run applications written for other kernels on ours. This also aids my primary tutorial goal of showing how theory and practice combine to produce the familiar.
Modularity
Moving slightly to kernel design, there are many schools on how to design a kernel, and they generally form a scale from “everything-built-together-in-one-big-blob” to “absolutely-everything-completely-separated”:
- Monolithic - Everything is built into one kernel binary.
- Modular - All functionality that can realistically be is moved into modules that are loaded at boot time.
- Microkernel - A very small kernel, and all functionality that can be (sometimes including memory management) moved out into nonprivileged applications called “servers”. The idea being that if they fail they can be simply restarted and not take down the entire kernel.
An example of a monolithic kernel is “classic” Linux - by classic I mean “Linux as it was in 1992 when Torvalds and Tanenbaum had their infamous argument”, and the counterexample of microkernel is Minix (written by Andrew Tanenbaum).
It should be noted that there are very few kernels that fit directly into one of these categories. Much like true free market or communist economies can never really exist, most tend towards a hybrid design with an inclination one way or the other.
Only if one is motivated by design ideals (Minix, GNU Hurd) or abnormal design constraints (QNX - hard real time, safety critical) does a design result that can be clearly categorised into one of the above.
That said, if I were to categorise the kernel we produce in this set of tutorials it would be modular monolithic - everything is built into one binary, but inside the binary everything is modularised and initialised separately at runtime.
I’m going to cut the OS theory short here - this isn’t meant to be a full OS theory introduction - see the OSDev.org wiki or Tanenbaum’s Minix book for a fuller discussion.
General project structure
Testing
I’m not really going to mention this much during the tutorial text, but I have developed this kernel such that it can be tested as much as possible. For each target-specific feature (such as paging) I have stubbed up an implementation that should work on any computer as a hosted process under linux. All of this code is in the “hosted” subdirectories. This allows me (and you!) to test the target-agnostic parts such as the scheduler and heap in isolation and with a proper debugger and valgrind.
Along with this we also have target tests, which are run via a python wrapper around qEmu.
In the tutorial documentation I will not explicitly mention the use of tests, but tests will have been written for every feature and chapter. Similarly I will keep the focus on the target in question (x86/x64/arm), and not mention the hosted build at all (except for this first chapter!).
Code layout
The code is layed out something like this:
.
+-- doc
+-- examples
+-- scripts
|   +-- elftools
|   `-- pyelftools-0.20
+-- src
|   +-- adt
|   +-- hosted
|   +-- include
|   +-- third_party
|   `-- x86
`-- test
    +-- lit
    `-- x86
scripts holds a bunch of scripts for interacting with qEmu (see later),
generating floppy disk image (again, see later) and manipulating the graph of
chapter dependencies (for my use only ;) ).
All the source is in the src subdirectory, with hosted holding code
relating to hosted mode (stubbed linux subprocess), x86 holding the x86
and x64 specific code, and adt holding some abstract data types (such as
an extensible bitmap) used elsewhere in the kernel.
Build system
Provided with the code is a simple makefile. It takes as input a target - this can be one of ‘HOSTED’, ‘X86’, ‘X64’ or ‘ARM’:
TARGET=HOSTED make
Replace “HOSTED” with “X86”, “X64” or “ARM” for your preferred target.
Modules
The rigorous use of modules (theoretically) allows each chapter of the tutorial to be self standing, and ideally fully pluggable - you should be able to just take the “threading.c” file, add it to the src/ directory and then end up with a kernel that can multi-thread.
This is achieved using a bit of ELF magic.
ELF stands for Executable and Linking Format, and is the object and executable format for UNIX systems. At the object file stage, it has the concept of “sections” - data normally ends up in the ”.data” section for example, and code ends up in the ”.text” section.
Using compiler-specific attributes (GCC and Clang support them) we can arrange for certain variables to end up in a different section, or a completely new one.
For example, given the following code in a.c:
int a __attribute__((section(".mysection"))) = 4;
int b __attribute__((section(".mysection"))) = 6;
int c = 8;
The symbols a and b will end up in the section called ‘.mysection’,
and c will end up in the default section for data, which is called
.data (it is usual but not required to start a section name with a dot).
Interestingly however, if we name the section so it only contains letters,
numbers and underscores, the linker will automatically generate two symbols -
__start_SECTION and __stop_SECTION - these symbols mark the start
and end of that section.
So let’s assume we put a and b above into the section ‘mysection’.
In b.c, we could then reference __start_mysection and
__stop_mysection as external variables and use them to find b and
c:
extern int __start_mysection, __stop_mysection;
printf("%d, %d, %d\n", &mysection_start[0], &mysection_start[1],
                       &mysection_start[1]);
This is how we specify which modules to load. Each module has a descriptor
structure (called module_t). One of these is made global and put in a
special section ‘modules’. Code then reads this array of modules and loads
them in turn (depending on their dependencies, of course!).
The advantage of this over a global list is we can add new modules without
adapting main.c at all, which fits my personal goal of maintainability :)
Code!
#include "hal.h"
#include "string.h"

#if defined(HOSTED)
# include <stdio.h>
#endif
Hardware abstraction
The most important thing about our entire kernel is the interface between all of the core modules. This will be defined globally as the HAL or hardware abstraction layer.
This allows target-agnostic parts of the kernel to link with and use the target-specific parts they need. All functions are going to be declared up-front, and then defined as “weak” in hal.c with stubbed, “do-nothing” implementations. A weak function is an ELF (executable and linking format, the canonical POSIX object file format) concept - it defines a function but allows it to be overridden at link time if another function exists with normal “global” linkage. The idea behind this is that when you add a new file with a real implementation of a function, that function is “global” and so overrides the “weak” implementation in hal.c without any intervention. So with this base, we can build a kernel that can have functionality added easily.
This file contains interfaces for many parts of the kernel, and so explaining all of it at this point would require also explaining many concepts that will appear later, so I’ll leave it undocumented for now and come back to pieces in later chapters.
#ifndef HAL_H
#define HAL_H

#include "types.h"

typedef struct spinlock {
  volatile unsigned val;
  volatile unsigned interrupts;
} spinlock_t;

/* Platform specific hal.h's are required to define the following:
     - void abort(), with attribute "noreturn".
     - void far_call(void *fn, uintptr_t stack), which must call 'fn' with
       the given stack.
     - typedef jmp_buf, which must have type "array of length 1", e.g.:
         typedef jmp_buf_impl jmp_buf[1];
       This trick was taken from the GNU header setjmp.h, and means jmp_buf
       can be treated as a pointer yet still have static storage.
     - struct regs, which is implementation defined and is passed to
       interrupt handlers and the debugger. */
#if defined(X86)
# include "x86/hal.h"
#elif defined(HOSTED)
# include "hosted/hal.h"
#else
# error Unknown target!
#endif

/* Call to send the system into a panic. */
void panic(const char *message) __attribute__((noreturn));
void assert_fail(const char *cond, const char *file, int line)
  __attribute__((noreturn));
void kmain(int argc, char **argv);
/*******************************************************************************
 * Initialisation / finalisation function registration
 ******************************************************************************/

/* Module initialisation state - only really used by main.c */
enum module_state {
  MODULE_NOT_INITIALISED,
  MODULE_PREREQS_RESOLVED,
  MODULE_INIT_RUN,
  MODULE_FINI_RUN
};

/* A prerequisite of a module. A client should only fill in the 'name' member -
   the 'module' member is filled in by main.c. */
typedef struct prereq {
  const char *name;
  struct module *module;
} prereq_t;

/* Structure defining a function to be run either on startup or shutdown. */
typedef struct module {
  /* Members that should be initialised statically. */
  const char *name;        /* A unique identifier for this function.*/
  prereq_t *required;      /* Either NULL or a NULL-terminated list of
                              module names that are prerequisites of this. */
  prereq_t *load_after;    /* Either NULL or a NULL-terminated list of
                              module names that are not hard prerequisites
                              but if available then this module must be loaded
                              after them */
  int (*init)(void);       /* The startup function to run. Returns 0 on success */
  int (*fini)(void);       /* The shutdown function to run. Returns 0 on success */

  uintptr_t state;
  uintptr_t padding[2];    /* Ensure size is a multiple of pointer size. */
} module_t;

/* Mark an instance of a module_t object as 'run_on_startup' to
   have it run on startup, e.g.:

     static module_t x run_on_startup = {...}; */
#define run_on_startup __attribute__((__section__("modules"),used))
That said, the first thing we are going to do is write code to load modules, so let’s look at a small part - the functions and structures that define the interface between modules.
This interface defines a structure module_t that we can use to
define a function (for module initialisation or teardown) that must be run at
startup or shutdown. The “name” field gives the name of the module, and
“required” gives a (NULL-terminated) list of the functions this one
requires before it can run. “fn” is the actual function itself.
“load_after” gives the concept of a soft dependency. Names in this list are not required in order for this function to run, but if they are available to load then they must be run before this module is run. An example of using this is the console module - it does not require both the “screen” and “serial” modules but if either is available they must be loaded before console.
A module makes an instance of one of these structs, and marks it “run_on_startup”. You’ll see that the definition of this macro does some attribute magic - the same attribute magic I mentioned earlier - the variable this gets applied to gets put in the special ‘.modules’ section.
A module has a name, which must be unique, and a list of modules it requires. These are hard requirements - if a module in the required list is not available then the module loader will panic. There is also a soft requirement list, which will not cause a panic if it isn’t available but if it is available, it must be loaded before this module. It also has two function pointers, one for the initialisation function and one for the termination function. Both are optional.
I should mention here that the kernel is designed to have two modes - to function as a full kernel (in which case all modules are loaded) and to function as a test harness, in which case we may specify just one module to load and only want to load it and its dependencies (and its dependencies’ dependencies and so on - referred to as the “transitive closure” of the dependencies).
With that in mind let’s next define the entry point to the kernel proper. Note that this is the target-agnostic entry point - there may (and will) be target-dependent startup code before we get to this point.
/* Symbols defined by the linker, the address of which can be treated as
   a module_t*. */
extern module_t __start_modules, __stop_modules;

static void earlypanic(const char *msg, const char *msg2);
static module_t *find_module(const char *name);
static void resolve_module(module_t *m);
static void init_module(module_t *m);
static void fini_module(module_t *m);
static void log_status(int status, const char *name, const char *text);

/* If this variable is overridden by a strong global, we are in test harness
   mode and must only run the hard prerequisites of this module. */
module_t *test_module __attribute__((weak)) = (module_t*)NULL;
The main function uses multiple helpers, which will be defined shortly.
You see that it uses the symbols __modules_begin and __end_modules -
these are defined by the linker script as described in the example above.
It also defines a weak module_t* instance test_module - This defines
if the kernel is supposed to run in test harness mode. If a test defines
a global symbol test_module, that will override this weak definition and
be used instead.
In that case we only load the test module’s dependencies.
int main(int argc, char **argv) {
  /* Start by running the startup functions. */
  for (module_t *m = &__start_modules, *e = &__stop_modules; m < e; ++m)
    m->state = MODULE_NOT_INITIALISED;

  for (module_t *m = &__start_modules, *e = &__stop_modules; m < e; ++m)
    resolve_module(m);

  /* Try and initialise the kernel console first in case we need to panic. */
  module_t *m = find_module("console");
  if (m)
    init_module(m);

  if (test_module) {
    init_module(test_module);
  } else {
    for (module_t *m = &__start_modules, *e = &__stop_modules; m < e; ++m)
      init_module(m);
    /* Then run the main function, unless we're in test harness mode. */
    kmain(argc, argv);
  }

  for (module_t *m = &__start_modules, *e = &__stop_modules; m < e; ++m)
    fini_module(m);

  return 0;
}
You may notice that this calls a function not yet defined.
kmain is declared in hal.h, and is intended to be overridden by a
loaded module. Its default behaviour is to call debugger_trap, which
if a kernel debugger is installed will launch the debugger, else will
loop forever.
static void resolve_module(module_t *m) {
  if (m->state >= MODULE_PREREQS_RESOLVED)
    return;

  for (prereq_t *p = m->required; p != NULL && p->name != NULL; ++p)
    p->module = find_module(p->name);

  for (prereq_t *p = m->load_after; p != NULL && p->name != NULL; ++p)
    p->module = find_module(p->name);

  m->state = MODULE_PREREQS_RESOLVED;
}

static void init_module(module_t *m) {
  if (m->state >= MODULE_INIT_RUN)
    return;
  m->state = MODULE_INIT_RUN;

  if (m->required)
    for (prereq_t *p = m->required; p != NULL && p->name != NULL; ++p) {
      if (!p->module)
        earlypanic("Module not found: ", p->name);
      else
        init_module(p->module);
    }

  if (m->load_after)
    for (prereq_t *p = m->load_after; p != NULL && p->name != NULL; ++p) {
      if (p->module)
        init_module(p->module);
    }

  if (m->init) {
    int ok = m->init();
    log_status(ok, m->name, "Started");
  }
}

static void fini_module(module_t *m) {
  if (m->state != MODULE_INIT_RUN)
    return;
  m->state = MODULE_FINI_RUN;

  if (m->required)
    for (prereq_t *p = m->required; p != NULL && p->name != NULL; ++p) {
      if (!p->module)
        earlypanic("Module not found: ", p->name);
      else
        fini_module(p->module);
    }

  if (m->load_after)
    for (prereq_t *p = m->load_after; p != NULL && p->name != NULL; ++p) {
      if (p->module)
        fini_module(p->module);
    }

  if (m->fini) {
    int ok = m->fini();
    log_status(ok, m->name, "Stopped");
  }
}
Now we define helper functions. I’m not going to explain them much, I should hope that you can find their purpose from reading them (else I can’t write code as well as I should!) and I can’t add anything by describing them.
static module_t *find_module(const char *name) {
  for (module_t *i = &__start_modules, *e = &__stop_modules; i < e; ++i) {
    if (!strcmp(name, i->name)) return i;
  }
  return NULL;
}
... although I will explain where strcmp comes from.
In a kernel, you don’t have access to the C standard library. Which means
you have no strcmp/memcpy/memset. In stdlib.c, I have implemented a few
functions that are pretty much required in any C program.
We also have access to a few standard headers. <stdint.h> comes with the
compiler, not the standard library implementation (glibc) and so we can
use it in baremetal mode without a problem. We just need to give the right
compile flag (“--nostdlibinc” instead of the more commonly known
“--nostdinc”).
/* Write a message to the console. */
static void log_status(int status, const char *name, const char *text) {
  write_console("[", 1);
  if (status == 0)
    write_console("\033[32m OK \033[0m", 13);
  else
    write_console("\033[31mFAIL\033[0m", 13);
  write_console("] ", 2);
  write_console(text, strlen(text));
  write_console(" ", 1);
  write_console(name, strlen(name));
  write_console("\n", 1);
#ifdef HOSTED
  printf("main: %s %s with status %d\n", text, name, status);
#endif
}

static void earlypanic(const char *msg, const char *msg2) {
  write_console("PANIC! ", 7);
  write_console(msg, strlen(msg));
  if (msg2)
    write_console(msg2, strlen(msg2));
  write_console("\n", 1);

#ifdef HOSTED
  printf("main: PANIC! %s %s\n", msg, msg2);
#endif

  for (;;) ;
}
Building on the concept of using HAL functions before they are implemented,
the next few functions use the function write_console, whose purpose
should be easy to understand! This again is declared in hal.h and allows
access to the kernel console. It takes a character array and a length. We’ll
define it later. Until then, it’ll be difficult to test this code unless we
are on a hosted platform (running as a hosted process under linux, with
TARGET=HOSTED and printf available!).
earlypanic() will attempt to panic the kernel at a very early stage.
Of course, at this point we don’t have a console module, so this will fail to show anything.
... and that should be that. It can only be tested so far in hosted mode - configure with:
TARGET=HOSTED make -j
Then run ./src/kernel. In the next chapter we’ll define startup code to
allow booting natively baremetal.